Accounting Cost vs. True Cost – Analyzing Costing in Business Central

Overview

In Microsoft Dynamics 365 Business Central (formerly Dynamics NAV), when doing costing and profitability analysis, you need to differentiate between a transaction’s True Cost and Accounting Cost.

These terms will not appear on any official documentation or manuals, I made them up for a lack of better terms.

To better explain the difference between True Cost and Accounting Cost, we will use this example:

  • Aug 15, 2021 – Item A was received at 10 pieces for $2.00 each.
  • Aug 30, 20216 pieces of item A was sold for $5.00 per piece
  • Sept 1, 2021 – The vendor invoice for Item A is posted at $3.00 per piece
  • Sept 15, 2021 – The freight invoice came in and item charge is used to allocate an additional $1.00 per piece
  • Sept 20, 2021 – The rest of the 4 pieces of item A was sold for $5.00 per piece

Before we dive in, make sure the accounting department is properly closing each accounting period and the Adjust Cost – Item Entries are being ran.

Accounting Cost

Assuming on 9/30/21, you’re asked to do a sales analysis for the month of August. When the costing is analyzed for the sales made on 8/30/21, the COGS (Cost of Goods Sold) that accounting recognize will be $2.00 per piece.

This means that if we’re printing reports based on Value Entry posting date filter from August 1st, 2021 to August 31st, 2021, the profit margin would be 60% per piece!

Not bad! For the accounting department, the cost is indeed $2.00 per piece since that’s the only amount that was recognized and costed for in that period.

Some companies makes an accrual on the General Ledger side for the expected cost of good sold, but that’s a separate topic.

However, this number to business owners and management, of course, is incorrect.

True Cost

In actuality, the cost of the item should be $4.00 per piece because each piece came in at $3.00 with an additional $1.00 in freight charges. The profit margin of the item should be 20%, instead of 60%.

Another scenario is you’re running the sales report from 9/1/21 to 9/15/21, you would show 0 quantities sold, but the cost recognized in that period would be $12.00 ($1.00 in the additional vendor cost + $1.00 in the freight cost * 6 pieces sold).

If you did not check this report and you present this report to the management, be prepared field a load questions on the integrity of both you and the numbers.

Solution

Both Accounting Cost and the True Cost are correct! Do not assume otherwise!

It’s just a matter of how the user wants to look at the numbers. For the  accounting department, they need the numbers to be recognized in the proper periods so the previous period numbers does not get changed. For management, they want to see the true cost of sales transaction. What to do?

As a simple rule, the Value Entry table Cost Amount (Actual) field stores the accounting cost that’s recognized for that period. The Item Ledger Entry table Cost Amount (Actual) field stores the true cost. Note that the Cost Amount (Actual) on the Item Ledger Entry table is a flowfield to the Value Entry table.

Most Business Central reports dealing with Contribution Margin uses Value Entry table only.

One thing to note when presenting the report off of the item ledger to the management, depending on when you post the vendor invoice and other landed cost charges, the profitability number will change.

This means that, in our example, the profitability report ran on 9/1/21 will be different than the same report with the same filters ran on 9/20/21. However, in my experience, once you properly explain this concept to accounting and management, they will understand.

Note that you can also use the Value Entry table for calculating True Cost. However, just filter on the Valuation Date instead of the Posting Date.
Properly Setup Bin Code for Warehouse Management in Dynamics NAV

Overview
One of the most often asked about features when dealing with inventory is the ability to keep track of inventory by bins in the warehouse. While The Warehouse Management System will benefit the accuracy of the items that are stored in the bins, careful consideration must be made during setup so when you go live, less additional work is needed for the system to work for you.

On a macro level, before you eve consider implementing a warheouse management system, your warehouse itself MUST BE ORGANIZED! What I always tell customers is that the purpose of a computer systems is to help you do something faster. This means that if you’re warehouse is a mess, implementing a warehouse system will make it more messy, faster. However, if you’re warehouse operation is efficient and optimized, then implementing a warehouse system will help you become more efficient and optimized, faster.

The Bin Codes
While there are many considerations for setting up warehouse management in NAV, this article will focus on one of the most overlooked areas.

The Bin Codes.

The Path of the Picker
There are many differnet theories about how to create the most efficient picking path. But generally, you want the path of the picking so the following occurs:

1. When picking for an order, they would not have to come back to the same bin in the same level
2. When picking, they should pick from the eye level (or the level where they don’t need special equipment). This is typically the first level.

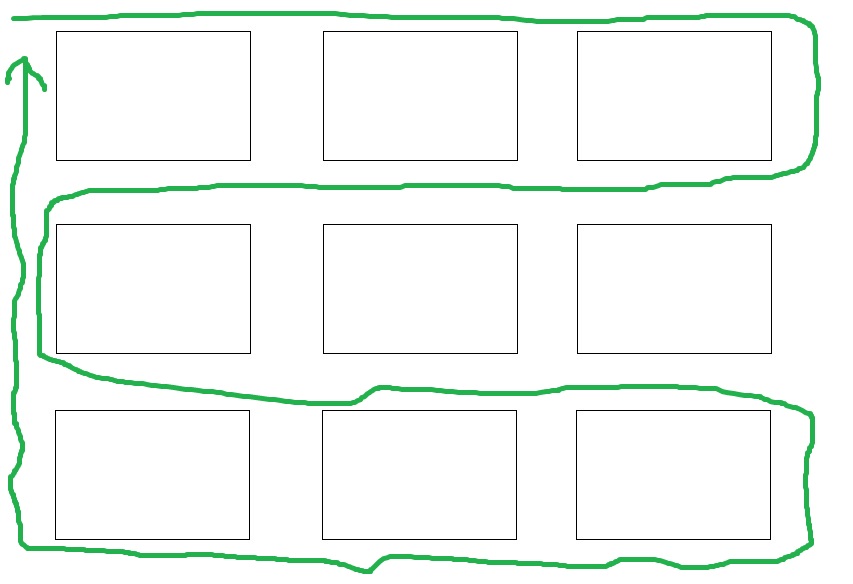
Keeping it simple and not concerning with spliting into Zones, wave picking, and whatnot, the pattern the warehouse picker should walk is the following:

Warehouse path for picker

Only when the above is exhausted, do we use special equipment and pick from the higher levels. The general rules are the same, you want to use the run time for the special equipment should be as minimal as possible.

The Sort Order of the Pick Bins
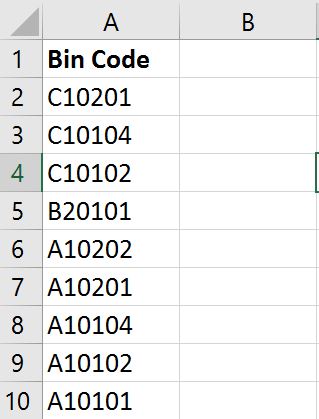
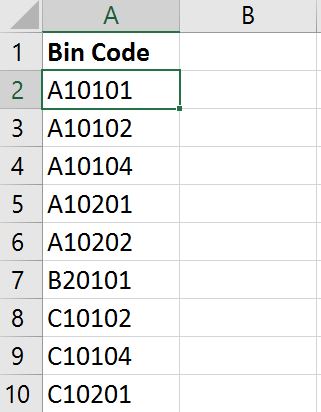
In order to get the path described above, we have to first understand how Dynamics NAV priortizes what bin is selected when a pick is generated. Consider the following bins numbers for your warehouse:

Typical Bin Code for Warehouses

The first 2 characters is Section, then Isle, then Level

When the pick from NAV is generated, it will suggest the pick in the following order (assuming no bin ranking is used).

NAV Suggested Pick Order

As you can see, it will create the pick on a decending order.

Why Suggest the Bins in Decending Order?
The answer lies in the help for the Bin Ranking field found in the Help or on MSDN:

The program will suggest a pick from the bin with the highest numerical ranking. Items in the highest-ranking bins (bins with the highest number in the field) will thus be picked first

Makes sense.

Why Not Use the Bin Ranking?
We could. But tread carefully! Bin Ranking provides a lot of flexibility on how the bins are ordered during the directed pick/put-away. Not paying special attention to how to rank the bins will give you more pain and suffering.

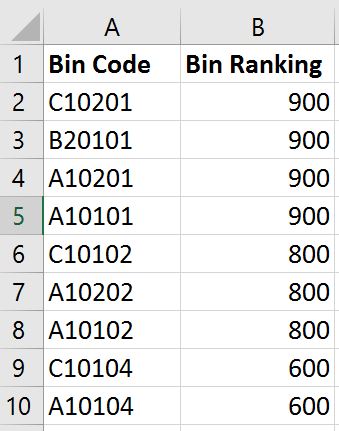
Assuming you rank all of the 1st level bins the highest, and level 4 the lowest. The resulting pick order NAV would generate for its pick is the following:

Warehouse4

This means that NAV will ask the warehouse picker to pick from the section that’s furthest away from the warehouse (assuming that’s section C). Very good for letting your warehouse picker get excercise, not really good for pick efficiency.

Two Ways You Can Go About This

Property Setup the Bin Ranking
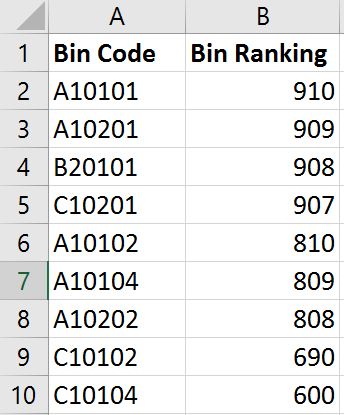
If you want to utilize the Bin Ranking, then you will need to sort it based on how you want the warehouse user to logically pick/put-away. In the example above, the bin ranking would be set as the following:

Proper Bin Ranking Setup for a Warehouse

You will need to carefully configure how to assign the bin ranking. In addition, if there are any changes to your bins (add/remove), you will need to break out the spreadsheet and reassign all bin rankings again.

Modify the Default Bin to sort in Acending Order instead of Decending Order
Doing so will allow Dynamics NAV to “sort” to pick from A section to D section. However, it will also ask the picker to pick from multiple levels first instead of the 1st level.

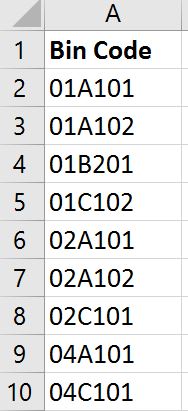
You will need to reconfigure how your bin codes are setup. Instead of Section – Row – Level, you will need to reconfigure your layout as Level – Section – Row:

Warehouse6

This will ensure that all of the 1st levels are picked first. Then it will then pick the 2nd level, then the 3rd, etc. This option may not be feasible if you’ve already spent the time and effort on labeling all of your bins. This option may also not be feasible if you want them to pick from the same column once they got the forklift truck. However, this option will require the least amount of maintenance.

Conclusion
Having implemented both methods for clients with warheouse management requirements for Dynamics NAV, both methods have their pros and cons. And they both work for the respective companies.

Bin Ranking will work wonders if you take the time to set it up right, but maintenance is a hassel. Reconfiguring the bins is simple, but you have to becareful about how NAV sorts the bins.

Again, both methods work. It really depends on how you implement this.

Entering Beginning Inventory Balance

When moving from a legacy system into Dynamics NAV (Navision), one of the areas you want to try and avoid is messing with the inventory G/L accounts. Most systems are usually pretty good with open A/R and A/P accounts, they can be transferred using the “posting back to the same account” technique that most implementers do. The beginning A/R and A/P G/L accounts would be based on your entry on the General Journal. This is assuming that the A/R and A/P aging reports matches the G/L.

Inventory valuation is one of the areas where we find the most discripencies based on what is entered on the Item JournalĀ  from the physical count and the inventory valuation report from the legacy system. Depending on your requirements, sometimes it doesn’t make sense to go through line by line on the item journal to see where the differences are.

A rule of thumb I always go by is to let Navision determine what the inventory value should be in the G/L based on the positive adjustments posted from the Item Journal.

To accomplish this, do the following:

Suppose you have the following G/L accounts:
11000 – Inventory
58850 – Inventory Adjustment

When posting a positive adjustment in the Item journal, it will post a debit to Inventory and credit to Inventory Adjustment.

When you’re ready to enter your beginning G/L balance, enter the G/L balance for Inventory to account 58850. This way, the difference between the inventory G/L balance from the legacy system and Navision will be reflected on account 58850.

If you do not want to reflect the adjustment in the current period due to financial reporting reasons, you can adjust the difference into an asset account. We usually recommend create a separate account (i.e. 11100 – Inventory Suspense) to store this difference until you can depreciate it.

By not posting any general journal entries to the inventory accounts, you’ve ensured that inventory valuation reports will ALWAYS match G/L, making everyone happy in the process.