Independence with Dynamics 365 Business Central online

Overview

I’m sure you’ve already read a lot of good reasons on why moving to Dynamics 365 Business Central Online is the greatest idea ever. I will 110% agree with that statement.

But this article, I’m going to list out some of the reasons that comes to my mind when working with clients on Dynamics 365 Business Central from the point of view of a service provider like ourselves.

Not Locked into Any Hardware/IT Vendors (Other than Microsoft)

Can’t tell you how much this is an issue whether Business Central (or Dynamics NAV) is in the “cloud” or on premise.

Every company that touches your ERP system wants a piece of your pie. You’re dependent on whether your service provider is really watching out for you or not.

These include companies (or people) that manage your hardware, security, servers, hosting, network, etc.

There are IT companies and service providers that are always looking out for you as a customer. To those people, I applaud your integrity. We need more people like you in our industry. They assess the situation and will make good recommendations, even at the cost of their bottom line.

Conversely, there are companies put their own profits before the customer’s interest. Often, these companies are the hardest to work with.

These companies put up barriers and moats around their service offerings so they seem irreplaceable. When they entrenched, the opportunity for abuse will occur.

One such example is everyone’s favorite topic: security. Over protect and over complicate. The statement you will often hear when providing alternatives is “hackers will get in”.

Often we see outrageous quotes for new servers, firewalls, and security measures that corner’s a client into a tough spot.

The baseline conversation will always be “do you know how dangerous hackers are?”. Make it so complicated and so scary that no one will know what to do. Only complete trust in your hardware consultant can save you from these hackers.

Another tactic is to put your solution in their own private cloud that they spin up on Azure. If you try to move out of there and into your own Azure environment (or a hosting space that YOU control), it will cost you an arm and a leg. And a knife in your kidney.

Ugh.

This is where the beauty of Dynamics 365 Business Central Online shines.  The security, infrastructure, etc are all managed by Microsoft. Your financial data is safe behind Microsoft’s infrastructure.

One can always argue that Microsoft gets hacked as well. The chances of them being severely hacked is lower than if you or another hosting company hosting the system for you.

Bottom line is everything is hackable. The question is how fast can we get back up and running? Microsoft with it’s millions of customers with seemingly endless resources? Or your IT consulting company? And who will be paying for the recovery?

In the end, you’re getting a fixed price per user per month. You don’t need any of the other bloated nonsense.

Not Locked into Any Add-On Vendor

Often times, we come across companies utilizing an add-on that’s very intrusive and touches all parts of the system.

In addition, these heavy and intrusive add-ons are configured in the 30 million ranges, meaning you’re basically held hostage by whoever sold and implemented the add-on for you.

With Dynamics 365 Business Central, the Extension Marketplace, you can install and remove any add-ons or feature you want without any consequence.

In the old days, you had to have a developer spend hours and hours of billable hours to install and setup the add-on for you. If you don’t like the add-on? Good luck having it removed.

With Business Central it’s very different. You installed and used an add-on you don’t like? Simply click on a button to have it removed.

What’s even better is you can try out any add-ons in your sandbox environment on your own and at your own pace. You don’t need to incur any cost for any vendor to set it up for you.

Try before you buy. If you don’t like, take it out. Simple as that.

Not Locked into any service providers (Microsoft included!)

There are other cloud ERP software companies out there, but Dynamics 365 Business Central is unique in that (in majority of the cases) Microsoft won’t get directly involved in your specific implementation. The service portion is the relationship between you and the service provider or Business Central partner you choose.

This is pretty genius on Microsoft’s part. By not getting involved in the service portion, you won’t ever hate on Microsoft if the implementation service goes sour. Microsoft (or any search engine) can always recommend to a Business Central partner down the street.

Switching partners with Business Central is also a breeze. Don’t like your service provider? Cut ties and leave without having to sign any paperwork with Microsoft.

WARNING: When you have a custom modifications that you paid the solution provider to build on your behalf, make sure you obtain the source code! Or at least, when they create any custom mods on your Business Central tenant, make sure you’re able to download the source code when you go to the Extension Management page.

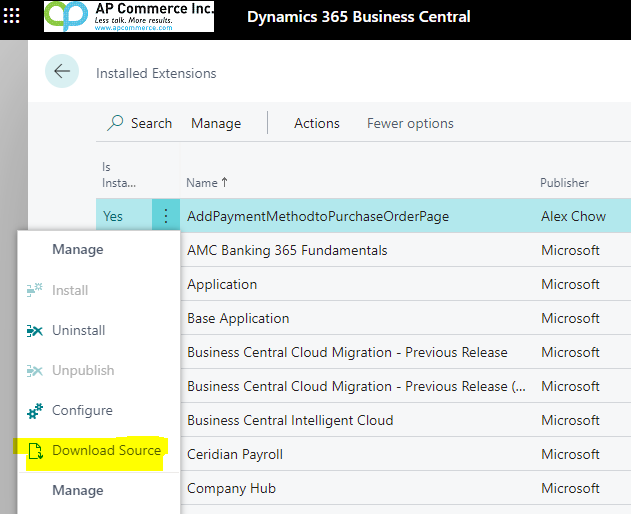
There are some partners that will try to keep you hostage by hiding the code THAT YOU’VE PAID FOR.

Make sure you get the source code or have access to the source code while you guys still have good relations.

Conclusion

The less dependent you are on the vendors, the more freedom you have on making decisions that’s good for your company. There are some vendors you want to keep, and some you want to fire. When you do part ways with a vendor, you want a clean break. Being dependent on your vendor for key aspects of your information system will make breaking up especially hard, and sometimes extremely expensive and painful.

Note that you’re still dependent on Microsoft if you go with Business Central online. However, if you choose utilize Business Central in the first place whether it’s on-premise, in private cloud, or BC Online, you’re already dependent on Microsoft. Why add more hands in the pot?

Keep things simple. The more simple you make the process, the easier it is to figure out what the problem is. Having different parties pointing finger at each other because they want a piece of the pie and not wanting to work for it is not the people you want around you.

Extension Development for Non-developers for Dynamics 365 Business Central

Overview

A lot of people using Microsoft Dynamics 365 Business Central want to learn how to develop and publish an extension on their Business Central tenant.

What drives this is that in the old Dynamics NAV, the users are able to easily add fields onto a page even if they’re not developers. Now that they’ve upgraded to Business Central, it’s not as straightforward. For people that are not developers, we want to give the ability to add fields on to a page back in their hands.

While browsing through Youtube, I couldn’t find the video that’s short enough that I felt comfortable sharing.

So I decided to make my own. 

Enjoy!

What You Need

Install VS studio code and AL code on your PC. Microsoft has a pretty good step by step instructions on how to install Visual Studio Code and the AL Extension.

https://docs.microsoft.com/en-us/dynamics365/business-central/dev-itpro/developer/devenv-get-started

Conclusion

I tried to make the video as short, easy, and to the point as possible. I understand there are lots of syntax for the language that I didn’t cover.

If you’re interested in learning more about how to write complex functions, let me know and I’ll make a separate video in the future.

Export to Excel in Dynamics 365 Business Central v19

Overview

Relax folks, Microsoft didn’t remove the Export to Excel function in Dynamics 365 Business Central starting from v19. It’s just been moved.

The Difference

Old Version (or versions prior to Business Central v19):

Starting from Business Central v19:

Why The Change?

The direction from Microsoft is to integrate more and more Microsoft 365 application into Business Central. Having a organized place where you can export the data into other Microsoft 365 application is one small step in that direction.

Conclusion

Yes, we’re getting a ton of “The export to Excel function is gone. PLEASE HELP!” questions.

Permission Setting – Preventing Malice vs Accidents

Overview

Permission setting in Dynamics 365 Business Central is a serious, but not serious topic.

When a company coming from a legacy system or no system, they will always want to restrict everything. The older systems are easier to restrict because there’s not a lot of functions you need to worry about. A considerable amount of business processes had to be complimented with manual processes.

In another words, they couldn’t do anything in the legacy system anyway. This is one of the reasons why they’re migrating to Dynamics 365 Business Central.

In my experience, after the company goes live, permission will more likely become an non-issue rather than first priority. The reason is the users can now do a lot more than what their old system can do. They require less time depending on other people for troubleshooting because they have access to troubleshoot the problem on their own.

When operation is smooth, things are smooth.

Nonetheless, when the discussion comes up about setting permissions, there are a few areas and key points to consider.

Ways to Restrict

There are basically 2 fundamental ways you can set security in Dynamics 365 Business Central.

  1. Assigning Permission Sets where you control what tables to access as defined by assigning users Permission Sets
  2. Profile and Role Configurations where you restrict the user’s access to icons and functions

The combination of setting the permission sets and configuring the personalizations for user roles should net you the exact permissions for your organization.

In addition, there are tools like Recording Permission Sets that allows you to set the permission based on what the user actually does in the system so you don’t need to rely on the standard permission sets for the user.

To restrict what the users can see on a particular page, after you’ve customized their profile roles, you can remove the personalization options so they can’t mess around with showing fields they’re not supposed to see.

Having it Just Right

Administrators will make the mistake of setting too much permission where the user can’t do anything. Every little problem they encounter, they will need to reach out to other departments or the supervisors. Give too little they will access the areas they’re not supposed to access.

The guideline to which I always recommend to clients on setting security and access is: “why are you setting this permission”?

  1. Are they using the access to the information for malice?
  2. Are you restricting the access because they might make a mistake?

If giving them access to prevent them from making mistake, I will always advocate training instead of restricting.

In the modern workplace, I will always advocate empowering the  users with more, not less, access to information so they can troubleshoot their own problems and make better decisions on their own without having to bug someone else. Everyone is busy enough already.

If they’ll use the information for malice, then we for sure want to restrict them access and remove the functionality from the menu and permission sets. Having said that, I suspect when companies really get down what data users access for malicious reasons, there’s really not much areas that needs restricting.

Conclusion

Permission setting will take a lot of time. People will underestimate the amount of time required to get it just right.

I always recommend that the end user setup security for their own organization. The partner can do the initial framework, but to get everything exactly the way you want it, you have to get your hands dirty. Otherwise, prepare for large consulting bill and still not have it exactly the way you want.

One other caveat is that the more specific you get down to making your permissions “just right”, the more maintenance and overhaul you’ll need to do when your business requirement changes or new functionalities are introduced.

I can’t tell you how much time we have to “undo” restrictive permission sets in order to help move the company forward and expand their utilization of the system they purchased.

I guess the summary of this whole article about setting security is: Give the benefit of the doubt that the users will use the information for good, not evil.

Good luck!

How to Enter Beginning Bank Balance for Dynamics 365 Business Central v18 and Above

Overview

On Dynamics 365 Business Central release 18, Microsoft made significant changes to the bank reconciliation features. Most of the articles and videos on entering beginning bank balances are still based on the older versions Dynamics 365 Business Central or Dynamics NAV.

Just thought I would share with the community on setting up your beginning bank balances if you’re moving to Business Central from your legacy accounting /ERP software

The goal is to have your bank balance match your G/L account. Just posting whatever is in your G/L to your bank is not the way to go and you’ll run into trouble later in future reconciliations.

Do it right initially will save you tons of trouble later.

Here are the steps to enter the beginning balances of your bank when you’re migrating from your legacy ERP/accounting software to Dynamics 365 Business Central.

What You Need

As with anything, preparation is key. There are a few things you need before entering your beginning bank balance.

Assuming you’re going live with Business Central on December 1st, they are:

  1. Previous bank reconciliation before you go live. For example, if you plan to go live on December 1st, you’ll need the bank statement from November 30th.
  2. A list of outstanding checks and transactions not cleared by the bank up to November 30th
  3. Your reconciled G/L bank balance from your old legacy system. This means you need to do one last bank reconciliation from your legacy system up to November 30th

How do you know if you have everything put ready? Here’s a simple formula:

Your G/L balance for your cash/bank account as of November 30th
+/- Outstanding bank transactions that’s not been cleared
= Amount on the Bank Statement as of November 30th

For example:

G/L Balance as of 11/30 = 10,000
Outstanding uncleared checks and deposits as of 11/30 = 2,000
The bank statement that you got from the bank on 11/30 should be 12,000.

If the above formula is not true, do not proceed! Get it right so it can save you headaches down the road.

How This is Going to Work

Once you post the entries via General Journal (make sure the Account Type is Bank Account), run your first bank reconciliation as November 30th, or the period before you go live.

When you run your bank reconciliation for November 30th, manually enter the previous bank statement total in the Bank Statement Line section. DO NOT run the bank feed import for this period as nothing you import can be reconciled against.

Click on Matching -> Match Manually to match the entry that you’ve made for the Beginning Bank G/L Balance entry.

Once the matching is done for the beginning entry, you can post the reconciliation.

For your bank reconciliation for the following period, all of the unreconciled transactions will display for you to clear against.

Conclusion

Now you may be asking “But wait Alex, we won’t get your bank statement until a few days after we go live!”

That’s okay!

You don’t need your bank beginning balances as soon as you go live. We typically get the bank beginning balances (and other non-operation related balances) setup about a week after go live.

Accepting Dynamics 365 Business Central as a Mediocre Solution

Overview

I’ll admit that I’m a bit of an old school person when it comes to implementing Dynamics 365 Business Central (formerly called Dynamics NAV).

I believe when you make a decision to implement Dynamics 365 Business Central for your business, the transition should be smooth with minimal disruption.

In fact, these transition often make your process better as it sorts out (and eliminates) processes that are convoluted. It forces everyone within the company to at least take a hard look at what they’re doing and why they’re doing it.

I believe the transition process should be fully planned out and accommodations be made based on the individual circumstances for each company.

Furthermore, during the implementation process, there should be full understanding of:

  • What’s being done and what changes are going to occur
  • What’s being delivered by your Business Central partner
  • What’s being prepared by your own staff

But lately, I’m noticing a disturbing trend in our industry.

Disturbance in the Business Central Force.

When I speak to people that have implemented Business Central, they’re less than enthusiastic about going live with the software.

Digging deeper, I find a lot of common issues on why these business were less than happy with what they got. Here’s a list of the few common comments:

  • Received little to no training (online training was not sufficient)
  • No audit or testing on data being converted
  • Balances transferred over did not match
  • Disconnect between the users and the implementers
  • No response for requests for enhancements or modifications
  • No response for questions they have about the usage of the system

I think the cause of this is the current trend for implementing cloud based software is the automated or templated approach.

The idea is you list out all of the steps that are required to implement a new software, in this case, Dynamics 365 Business Central and you systematize it. In another words, it make it repeatable so anyone can go through the checklist and implement the ERP software.

The goal is so the solution center can hire anyone off the street at a discount, give them minimal training, and just have them follow the template with the customer to get them running in Business Central.

All this so the solution can offered at a lower priced to attract new customers who has no idea what’s going on.

Unfortunately, these low cost implementation trend is a race to the bottom. There’s always going to be the guy that can offer something at a lower price.

In most cases, to lower the price of implementation is to cut corners.

Sure, you can start using Dynamics 365 Business Central if all of your requirements are part of the template (which is the bare minimum). For anything else, you have to wait or you’ll need to figure out how to go around it on your own. The person that’s hired or contracted to help you will certainly not know the answer.

Accepting Less Than Mediocracy

I mean, I wouldn’t be as shocked if the people I spoke to received mediocre service and support. I’m more shocked that people just choose to accept less than mediocre service and support.

Some of the problems the people I spoke to seemed indifferent  to their situation:

  • Accept that requests for modifications takes weeks (sometimes months) to deliver
  • Accept no answers to their questions
  • Accept that they should hire internal staff to maintain Business Central
  • Accept the inconsistencies of working with contractors to the solution center
  • Accept their numbers are off right from the beginning
  • Accept the lack of training
  • Accept that you cannot have a deeper discussion about your business problems and how it can be addressed

I can go on and on, but I keep wondering…  At what point in time was this considered acceptable? Did I miss something?

Everyone talks about the destination. Nobody talks about the process.

Companies are excited about Business Central. It is the best mid-market ERP software. The number of improvements Microsoft has made is astounding. This is not including the strong integration with the existing Office 365 suite.

It’s exciting even for me, as a partner, to see what a fully deployed solution can do. We use it internally, and let me tell you, it has made deployment of these features a whole lot easier and a whole lot palatable. Not to mention how quickly and how organized we can operate as a cohesive team.

No one really pays attention to the question “exactly how do we get there”? Sure if you get a check list and go down the list to see what’s on the template and what’s being delivered, but is your business transformation really off of a templated checklist that you didn’t even create?

Conclusion

I’m not sure why companies are so accepting of their situation.

Do they feel that they’re trapped because they’re scared of what will happen to their data  in the cloud (which is managed by Microsoft) if they switch  software vendors?

Do they feel like it’s expensive to get a new vendor in?  Too much hassle since they’ve gone through it once already?

Do they feel that these problems are just temporary and they’ll just magically go away?

Or worst, do they feel every software vendor is the same and “that’s just how it is”?

Whatever it is, I sincerely hope that this is just a phase. And I hope we, as an industry, can do better.

Quick Video on Closing the Year in Dynamics 365 Business Central and Dynamics NAV

It’s that time of the year again. Close out the year! Most companies align their fiscal year to the calendar year so right around this time, we usually get a ton of support calls from people that forgot how to close the year end and need a quick refresher.

So I made a quick 2 minute video on how to do year end processing. Why? Because you can’t go through a 10 minute video in 2 minutes and I know you have a ton of other things to do.

I’m using the older version of NAV, but the menu tree is the same as in prior versions. To access the accounting period, in the video, the NAV 2013 has the icon pointing to Department – Financial Management – Accounting Period. If you go to Financial Management -> Setup in version 4.0 and 5.0, you’ll see the accounting period.

If you’re using Dynamics 365 Business Central, you can just search on the term Accounting Periods and you’ll be able to start on the same process:

The processes are exactly the same from version Navision version 1.2 to Dynamics NAV 2018 to the newest version now called Dynamics 365 Business Central.

The One Huge Mistake You’re Making When Setting Up WMS for Dynamics 365 Business Central

Overview

I mentioned In my previous article that there are multiple ways of setting up warehouse management.

In reality, however, there really are two ways: there’s the option of setting up your warehouse with Directed Pick and Put-away…and the wrong way.

In almost all companies where bin location management (or warehouse management using wireless scanners) is desired, setting up your warehouse with Directed Pick and Put-away will be the correct decision.

The Setup

Assuming you’ve done the necessary prep work in your warehouse for a warehouse management system, you will then need to configure the existing Locations in Business Central to be warehouse enabled.

Basically, to enable a location for Direct Pick and Put-aways, you will need to run a process called Create Warehouse Location from the Location List.

Then, you will need to enter the Location you wish to enable the Directed Pick and Put-away for, in addition, the Adjustment Bin.

When you click on the Create Warehouse Location process, it will do the following:

  1. Enable Directed Pick and Put-away on the Location Card
  2. Move all inventory in the Location to the Adjustment Bin setup in the Location Card

The purpose of the Create Warehouse Location process is that it will move your inventory quantities to the Adjustment Bin.

Moving the items to the Adjustment Bin allows you to do a physical count using the Warehouse Physical Inventory Journal or the Warehouse Item Journal to move the items from the adjustment bins into the regular physical bins in the warehouse.

Any remainder inventory quantities not accounted for using the warehouse journals will be counted as Positive or Negative Adjustments when you run the Calculate Warehouse Adjustment process from the Item Journal.

The Problem

For the location (or warehouse) to be able to properly process orders with Directed Pick and Put-away enabled, you need to associate each Bin with a Bin Type Code and a Zone Code.

However, when you’re setting up the Zones and the Bins for the Location for the first time, you will NOT be able to define a Zone Code or a Bin Type Code against the Bin.

If you try to define a Zone and a Bin Type for the Adjustment Bin, you will counter an error saying the Zone Code must be blank.

The reason you’re getting this error is because you need the Directed Pick and Put-away marked as true on the Location Card in order to fill in the Zone Code and the Bin Type Code.

But you can’t mark the Directed Pick and Put-away as true if there are inventory quantities in the location. Which is enabled by running th Create Warehouse Location process.

And you shouldn’t run the Create Warehouse Location unless the Adjustment Bin is setup with the proper Zone Code and the Bin Type Code.

We have quite the problem here…

What if I Run the Process Without Zone and Bin Type?

Yes, you can run the process without defining the Zone and the Bin Type on the Bins, but that’s not what you should do. In fact, that’s where most people get in serious trouble.

After the Create Warehouse Location process is finished, you’ll want to go in and fill in some additional bins or begin setting up other bins in the warehouse.

However, if you go into the Bin screen to setup additional bins, you’ll encounter this error:

That’s correct. In order to add additional bins in a location with Direct Pick and Put-away enabled, BC requires you to have a Zone Code and  Bin Type Code.

Now you’re screwed.

If you continue using WMS in the current setup, you’ll have some bins with Zones and some bins without Zones.

When you do adjustments, it will not properly move items from the bins with Zones and bins without Zones, leaving you with tons and tons of inventory quantity problems that are too many to list in this article. That’s pretty much a nightmare.

You’re now in a world of hurt.

The Correct Way to Enable Warehouse Location

Before you run the Create Warehouse Location process, make sure you set up all of the Zones and the Bin Type codes with the zones.

How how do we do this if the system is blocking us from doing the right thing?

The answer is by forcing it using Rapidstart.

When you create the Bins, you need to utilize RapidStart Configuration Package to FORCIBLY fill in the Adjustment Bin Code WITH Zone Code and Bin Type Code.

The 4 fields you need on the Bin table are:

  • Location Code
  • Bin Code
  • Zone Code
  • Bin Type Code

This way, the bins will be inserted with the proper Zone Code and Bin Type Code when the adjustment entries are created.

Processing future transactions within the warehouse will flow normally and all in the world will be well again.

Conclusion

This is the conundrum when enabling a Location to be Directed Pick and Put-away. During the setup of the warehouse, you’re not able to use Zones. After the location has been converted to have full WMS, you’re required to use Zones.

While I’m not sure if Microsoft will address this issue in the future, at least, now you’ll know how to fix it.

That being said, having your warehouse move off of a manual-based process to an automated (or computerized) one, in itself, is often not an easy task as it requires buy-in from the warehouse users and reconfiguring the warehouse process so it all flows so flows in a smooth and consistent way…but this will be a topic for a separate article.

Different Flavors of Warehouse Management in Dynamics 365 Business Central

Overview

Dynamics 365 Business Central (formerly known as Dynamics NAV) is a comprehensive ERP system. As such, it has many features that caters the different needs of businesses, for example, manufacturing, service managment, CRM, distribution, etc. Each one of these functional areas can be configured a number of ways depending on the needs of the business. During my time working at AP Commerce, there are never any shortages of investigating different setups based on on the needs of a business.

What you think you need may not be what you need. Yes, I did write that in one stroke without flinching. One of the most common requests from potential and current users of Business Central (Dynamics NAV) is they want to effectively manage their warehouse using warehouse management system.

The question I’m always tempted to ask is: “What type of Warehouse Management are you looking for?” Of course I never ask that question because this will cause more confusion than I can handle.

So why am I tempted to ask that question? Again, in each functional area in Business Central (Dynamics NAV), there are a number of ways to set it up. Having said that, here are different ways to setup WHM for your business. Note that Warehouse Management can be defined per warehouse, so every warehouse that you have can be setup differently.

NOTICE! The purpose of this article is not to give you a complete step by step instruction on BC (NAV) warehouse management, the purpose is to give you some knowledge on different ways to go about implementing WHM so you can have some knowledge and input when you speak with your Dynamics NAV partner on it.

Considerations

One word of caution is when implement ANY warehouse management system, you have to make sure your warehouse is organized, efficient, and accurate. A lot of companies make the mistake of buying a warehouse management software because the warehouse is too messy.

DON’T DO IT!

Software, in general, is designed to streamline your operation and speeed up the processing. If your warehouse is disorganized, inefficient, and not accurate, any warehouse management software will make it worst. You will be disorganized, inefficient, and inaccurate at a faster rate. Garbage in, garbage out.

The Flavors

Here’s a picture of the Warehouse Mangement setup in Dynamics 365 Business Central (Dynamics NAV):

Bin Mandatory

From initial look, if you just want to keep track of the items on the bins, this is the option for you, right? Unfortunately, no… I’ve never been in an implementation where we just place a checkbox on this field without at least enabling Ship/Pick or Receive/Put-away.

Just checking this on enables you to keep track of items by bin, however, one of the main problem with just checking this on is that you specify bin on the purchase and sales order. So if you have an item that’s on 2 different bins, you have to split the sales/purchase lines. Not only that, if you want to move an item from one bin to another, you have to use the item reclass journal, which effectively creates Item Ledger, value entry, and the general ledger. Doing physical inventory may also create a lot of excessive entries that will bog you down when you use the Item Ledger to do any sales and purchase analysis.

Pros: Allows you to tag bin code to an inventory transaction

Cons: Have to split sales and purchase line so the quantity matches the bins on the item ledger Creates a lot of excessive entries to key ledger tables Makes life harder than it has to

You Typically See This Setup for: No one. You’re better off using the Shelf/Bin No. field on the item card. This is how NAV 2.0 handles bins. We’re in Business Central now, no sense in going backwards when there are better options.

Require Shipment/Receive

Just enabling these option allows you to use the Warehouse Ship/Receive function. The main purpose of the Warehouse Ship/Receive is to allow the user to batch the sales orders by a container or a trailer going out per carrier. This option is typically enabled for companies that ships and receives by containers. The warehouse shipment is typically used to generate your bill of lading for the trucker.

Without turning on Pick and Put-away, I would NOT recommend turning on Bin Mandatory. You would encounter the same problem that I’ve stated above. For smaller companies, spliting up the warehouse process may not be necessary.

Pros: Allows you to Ship and Receive by container or bill of lading Warehouse Manager can control what he/she wants to ship based on released orders instead of the order processor printing out a pick ticket The warehouse process is separated out from the order fulfillment process (so warehouse can do their own posting) More accurate inventory can be achieved since inventory can be relieved when it’s shipped

Cons: Not recommend to enable Bin Mandatory (same cons as above) Not necessary if you do not wish the warehouse people to be posting stuff

You Typically See This Setup For: Large item distributors or manufacturers that want split out their warehouse processing, but does not care of bin contents Companies that ship and receive by containers but do not want to split their items into bins in the warehouse.

Require Pick/Put-away (No Require Shipment/Receive)

This is an option is what I would like to call the mini-fullblown warehouse management. This options provides the flexibility for the warehouse staff to create warehouse put-away and warehouse picks as they see fit, they can also assign these warehouse documents to the appropriate people to do the processing. Another way to use this feature is to allow the order fulfillment people to create the pick request to the warehouse without actually printing a pick ticket.

The draw back of using this option is that you’re only allowed to have one sales/purchase order per put-away/pick. This means that you won’t be able to group the orders together in one warehouse shipment (as stated above) to generate a consolidated bill of lading. Same goes for the receiving side, you won’t be able to receive by container or by bill of lading.

This option works perfectly if you want to enable Bin Mandatory. The Inventory Pick/Put-away document generated will allow you to split lines at the warehouse document level so you can put the items away in their proper bin without having to modify the original purchase or sales order.

Pros: Allows you to easily process inventory transactions by Bin Warehouse Manager can control what he/she wants to ship based on released orders instead of the order processor printing out a pick ticket The warehouse process is separated out from the order fulfillment process (so warehouse can do their own posting) More accurate inventory can be achieved since inventory can be relieved when it’s shipped

Cons: Not able to group orders together into one shipment or receipt Not be able to use ADCS (wireless handheld)

You Typically See This Setup For: Companies that would like to organize their warehouse by bin, but does not have the manpower to go Directed Pick/Put-away.

Directed Pick and Put-away

This is the full deal. It has all of the benefits that I’ve listed above. Group order together by warehouse shipment and be able to pick and put away by bins. Not only that, this allows you to use ADCS (wireless handheld device) so your warehouse staff and record warheouse transactions using the handheld.

All good right?

Not exactly. It really depends on what your company needs. All these features sounds cool, but if your business does not need it, trying to shove it in may create more work and processes than necessary. There are a couple of steps where the user need to interface with a computer when you enable Directed Pick and Put-away:
1. Create the sales order
2. Create warehouse shipment
3. Create pick
4. Register pick
5. Post warehouse shipment
6. Post sales order

Whereas if you do not enable any of these, the steps would be:
1. Create the sales order
2. Post the sales order

Conclusion

It’s highly recommended that you get with your Dynamics 365 Business Central (Dynamics NAV) partner and discuss which setup is right for your business RIGHT NOW with consideration for future growth. If you try to implement everything without any consideration for your current operation, the operational efficiency will decrease. This is because of the increased overhead and maintenance that are required.

Make sure your company have the manpower and the infrastructure to absorb the overhead and maintenance required so the increase in efficiency and accuracy can be realized.

Do not implement some feature just because you like the feature. In most cases, it will be overkill. It’s like buying a size 10 top-of-the line Nike tennis shoes for your 3 year old son and forcing him to walk in it every day. Eventually, he will grow into it. But by the time he grows into it, he’ll develop some other major problems that will cost more money to fix.