The One Huge Mistake You’re Making When Setting Up WMS for Dynamics 365 Business Central

Overview

I mentioned In my previous article that there are multiple ways of setting up warehouse management.

In reality, however, there really are two ways: there’s the option of setting up your warehouse with Directed Pick and Put-away…and the wrong way.

In almost all companies where bin location management (or warehouse management using wireless scanners) is desired, setting up your warehouse with Directed Pick and Put-away will be the correct decision.

The Setup

Assuming you’ve done the necessary prep work in your warehouse for a warehouse management system, you will then need to configure the existing Locations in Business Central to be warehouse enabled.

Basically, to enable a location for Direct Pick and Put-aways, you will need to run a process called Create Warehouse Location from the Location List.

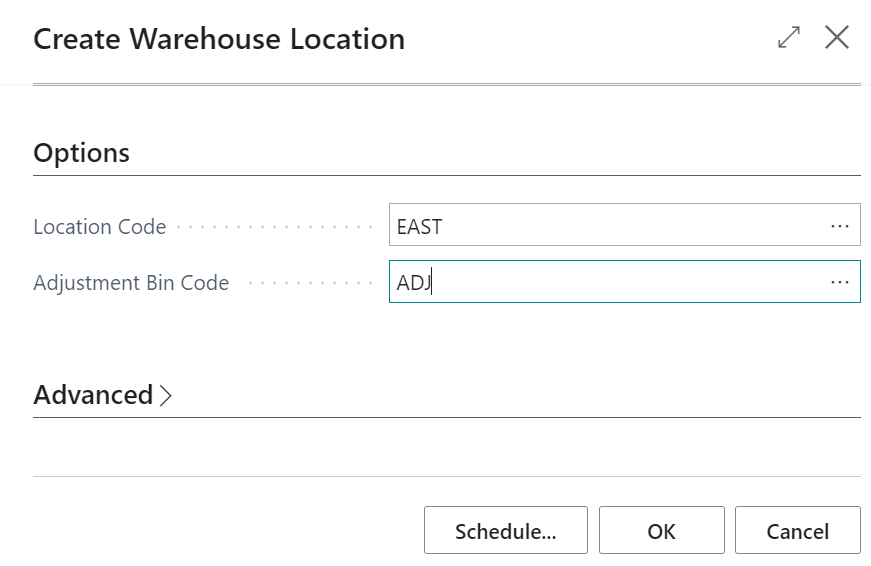
Then, you will need to enter the Location you wish to enable the Directed Pick and Put-away for, in addition, the Adjustment Bin.

When you click on the Create Warehouse Location process, it will do the following:

  1. Enable Directed Pick and Put-away on the Location Card
  2. Move all inventory in the Location to the Adjustment Bin setup in the Location Card

The purpose of the Create Warehouse Location process is that it will move your inventory quantities to the Adjustment Bin.

Moving the items to the Adjustment Bin allows you to do a physical count using the Warehouse Physical Inventory Journal or the Warehouse Item Journal to move the items from the adjustment bins into the regular physical bins in the warehouse.

Any remainder inventory quantities not accounted for using the warehouse journals will be counted as Positive or Negative Adjustments when you run the Calculate Warehouse Adjustment process from the Item Journal.

The Problem

For the location (or warehouse) to be able to properly process orders with Directed Pick and Put-away enabled, you need to associate each Bin with a Bin Type Code and a Zone Code.

However, when you’re setting up the Zones and the Bins for the Location for the first time, you will NOT be able to define a Zone Code or a Bin Type Code against the Bin.

If you try to define a Zone and a Bin Type for the Adjustment Bin, you will counter an error saying the Zone Code must be blank.

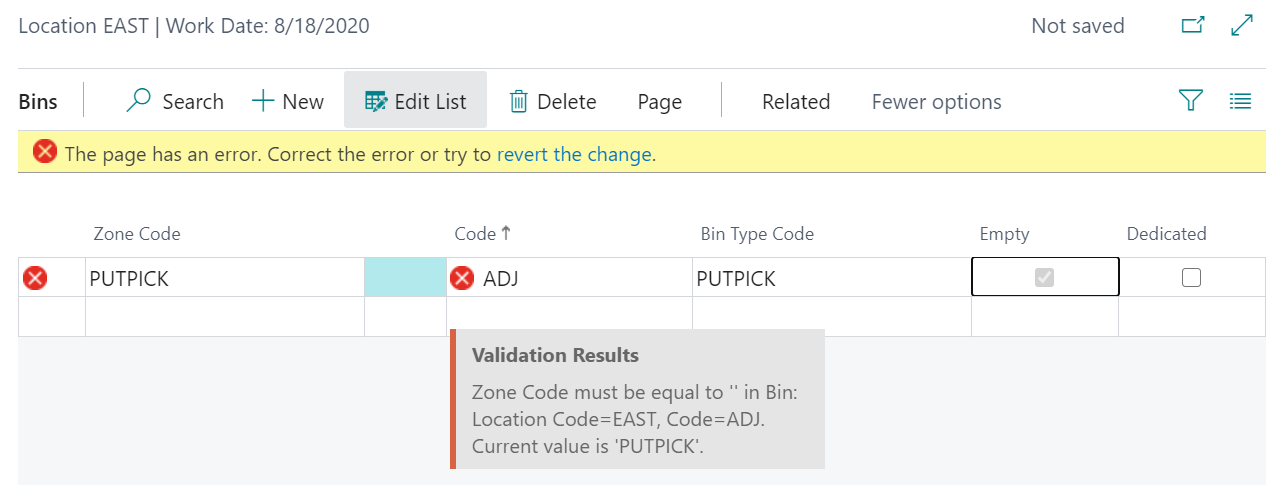
The reason you’re getting this error is because you need the Directed Pick and Put-away marked as true on the Location Card in order to fill in the Zone Code and the Bin Type Code.

But you can’t mark the Directed Pick and Put-away as true if there are inventory quantities in the location. Which is enabled by running th Create Warehouse Location process.

And you shouldn’t run the Create Warehouse Location unless the Adjustment Bin is setup with the proper Zone Code and the Bin Type Code.

We have quite the problem here…

What if I Run the Process Without Zone and Bin Type?

Yes, you can run the process without defining the Zone and the Bin Type on the Bins, but that’s not what you should do. In fact, that’s where most people get in serious trouble.

After the Create Warehouse Location process is finished, you’ll want to go in and fill in some additional bins or begin setting up other bins in the warehouse.

However, if you go into the Bin screen to setup additional bins, you’ll encounter this error:

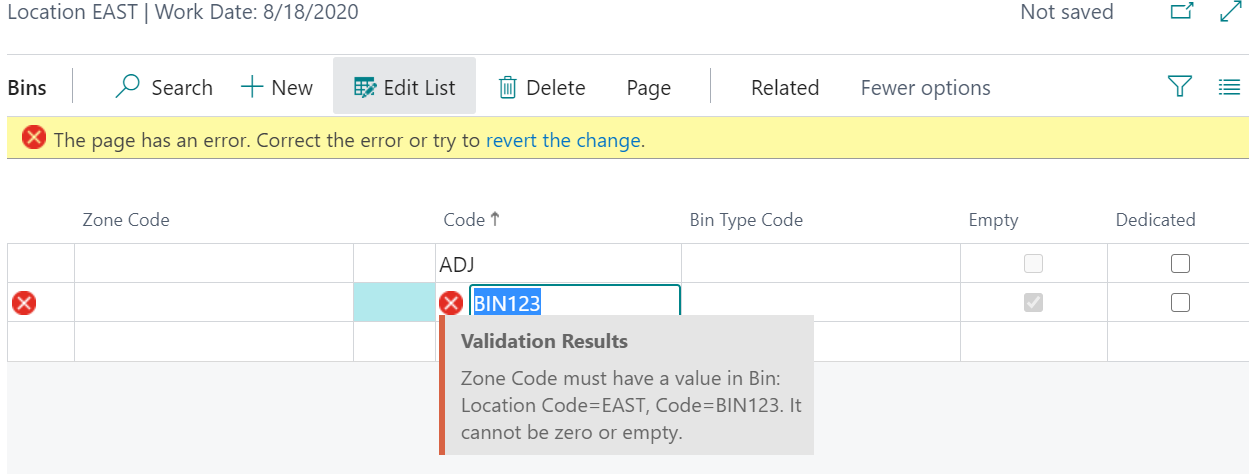
That’s correct. In order to add additional bins in a location with Direct Pick and Put-away enabled, BC requires you to have a Zone Code and  Bin Type Code.

Now you’re screwed.

If you continue using WMS in the current setup, you’ll have some bins with Zones and some bins without Zones.

When you do adjustments, it will not properly move items from the bins with Zones and bins without Zones, leaving you with tons and tons of inventory quantity problems that are too many to list in this article. That’s pretty much a nightmare.

You’re now in a world of hurt.

The Correct Way to Enable Warehouse Location

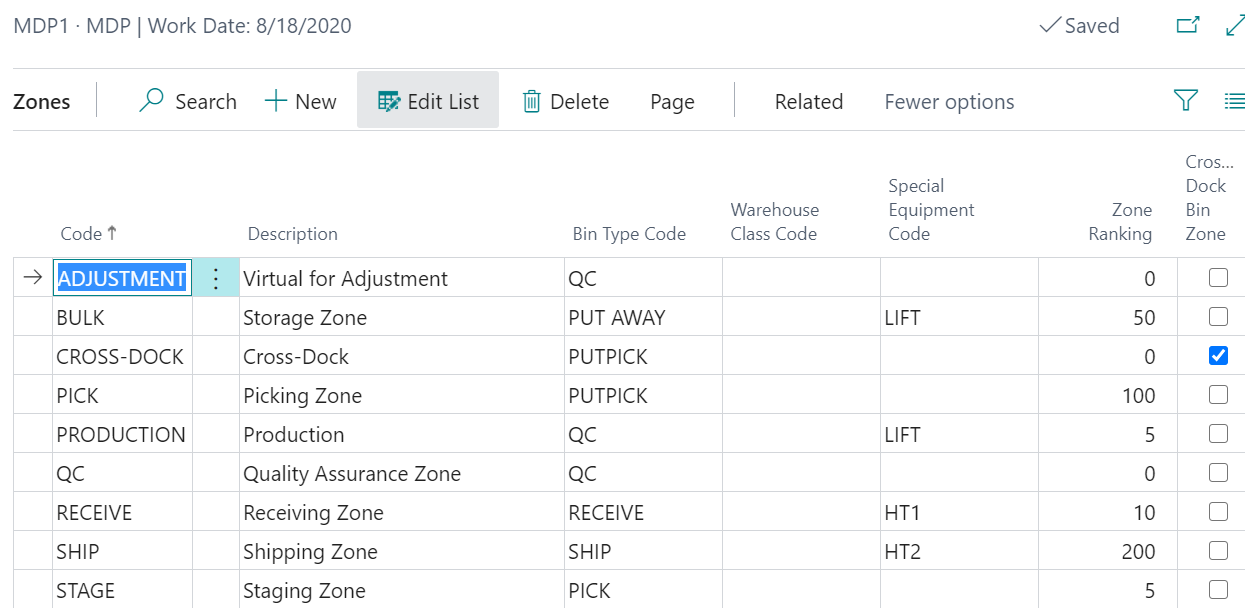
Before you run the Create Warehouse Location process, make sure you set up all of the Zones and the Bin Type codes with the zones.

How how do we do this if the system is blocking us from doing the right thing?

The answer is by forcing it using Rapidstart.

When you create the Bins, you need to utilize RapidStart Configuration Package to FORCIBLY fill in the Adjustment Bin Code WITH Zone Code and Bin Type Code.

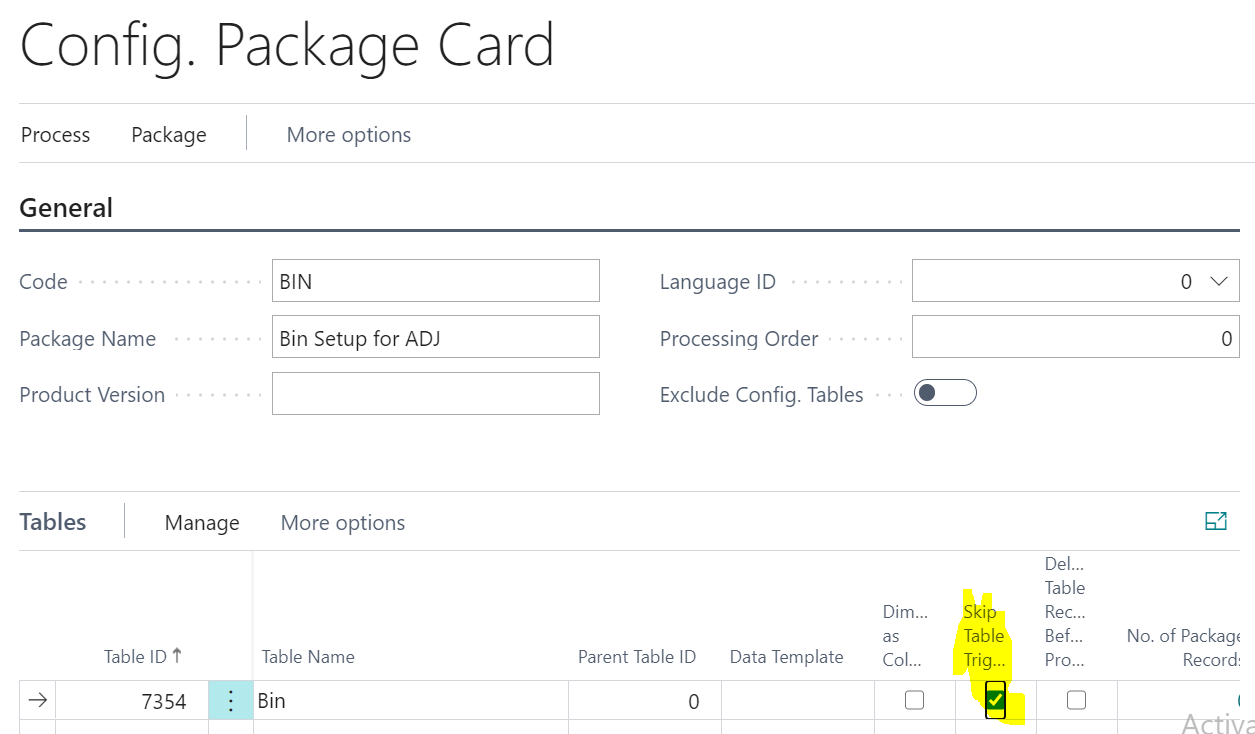
The 4 fields you need on the Bin table are:

  • Location Code
  • Bin Code
  • Zone Code
  • Bin Type Code

This way, the bins will be inserted with the proper Zone Code and Bin Type Code when the adjustment entries are created.

Processing future transactions within the warehouse will flow normally and all in the world will be well again.

Conclusion

This is the conundrum when enabling a Location to be Directed Pick and Put-away. During the setup of the warehouse, you’re not able to use Zones. After the location has been converted to have full WMS, you’re required to use Zones.

While I’m not sure if Microsoft will address this issue in the future, at least, now you’ll know how to fix it.

That being said, having your warehouse move off of a manual-based process to an automated (or computerized) one, in itself, is often not an easy task as it requires buy-in from the warehouse users and reconfiguring the warehouse process so it all flows so flows in a smooth and consistent way…but this will be a topic for a separate article.

Different Flavors of Warehouse Management in Dynamics 365 Business Central

Overview

Dynamics 365 Business Central (formerly known as Dynamics NAV) is a comprehensive ERP system. As such, it has many features that caters the different needs of businesses, for example, manufacturing, service managment, CRM, distribution, etc. Each one of these functional areas can be configured a number of ways depending on the needs of the business. During my time working at AP Commerce, there are never any shortages of investigating different setups based on on the needs of a business.

What you think you need may not be what you need. Yes, I did write that in one stroke without flinching. One of the most common requests from potential and current users of Business Central (Dynamics NAV) is they want to effectively manage their warehouse using warehouse management system.

The question I’m always tempted to ask is: “What type of Warehouse Management are you looking for?” Of course I never ask that question because this will cause more confusion than I can handle.

So why am I tempted to ask that question? Again, in each functional area in Business Central (Dynamics NAV), there are a number of ways to set it up. Having said that, here are different ways to setup WHM for your business. Note that Warehouse Management can be defined per warehouse, so every warehouse that you have can be setup differently.

NOTICE! The purpose of this article is not to give you a complete step by step instruction on BC (NAV) warehouse management, the purpose is to give you some knowledge on different ways to go about implementing WHM so you can have some knowledge and input when you speak with your Dynamics NAV partner on it.

Considerations

One word of caution is when implement ANY warehouse management system, you have to make sure your warehouse is organized, efficient, and accurate. A lot of companies make the mistake of buying a warehouse management software because the warehouse is too messy.

DON’T DO IT!

Software, in general, is designed to streamline your operation and speeed up the processing. If your warehouse is disorganized, inefficient, and not accurate, any warehouse management software will make it worst. You will be disorganized, inefficient, and inaccurate at a faster rate. Garbage in, garbage out.

The Flavors

Here’s a picture of the Warehouse Mangement setup in Dynamics 365 Business Central (Dynamics NAV):

Bin Mandatory

From initial look, if you just want to keep track of the items on the bins, this is the option for you, right? Unfortunately, no… I’ve never been in an implementation where we just place a checkbox on this field without at least enabling Ship/Pick or Receive/Put-away.

Just checking this on enables you to keep track of items by bin, however, one of the main problem with just checking this on is that you specify bin on the purchase and sales order. So if you have an item that’s on 2 different bins, you have to split the sales/purchase lines. Not only that, if you want to move an item from one bin to another, you have to use the item reclass journal, which effectively creates Item Ledger, value entry, and the general ledger. Doing physical inventory may also create a lot of excessive entries that will bog you down when you use the Item Ledger to do any sales and purchase analysis.

Pros: Allows you to tag bin code to an inventory transaction

Cons: Have to split sales and purchase line so the quantity matches the bins on the item ledger Creates a lot of excessive entries to key ledger tables Makes life harder than it has to

You Typically See This Setup for: No one. You’re better off using the Shelf/Bin No. field on the item card. This is how NAV 2.0 handles bins. We’re in Business Central now, no sense in going backwards when there are better options.

Require Shipment/Receive

Just enabling these option allows you to use the Warehouse Ship/Receive function. The main purpose of the Warehouse Ship/Receive is to allow the user to batch the sales orders by a container or a trailer going out per carrier. This option is typically enabled for companies that ships and receives by containers. The warehouse shipment is typically used to generate your bill of lading for the trucker.

Without turning on Pick and Put-away, I would NOT recommend turning on Bin Mandatory. You would encounter the same problem that I’ve stated above. For smaller companies, spliting up the warehouse process may not be necessary.

Pros: Allows you to Ship and Receive by container or bill of lading Warehouse Manager can control what he/she wants to ship based on released orders instead of the order processor printing out a pick ticket The warehouse process is separated out from the order fulfillment process (so warehouse can do their own posting) More accurate inventory can be achieved since inventory can be relieved when it’s shipped

Cons: Not recommend to enable Bin Mandatory (same cons as above) Not necessary if you do not wish the warehouse people to be posting stuff

You Typically See This Setup For: Large item distributors or manufacturers that want split out their warehouse processing, but does not care of bin contents Companies that ship and receive by containers but do not want to split their items into bins in the warehouse.

Require Pick/Put-away (No Require Shipment/Receive)

This is an option is what I would like to call the mini-fullblown warehouse management. This options provides the flexibility for the warehouse staff to create warehouse put-away and warehouse picks as they see fit, they can also assign these warehouse documents to the appropriate people to do the processing. Another way to use this feature is to allow the order fulfillment people to create the pick request to the warehouse without actually printing a pick ticket.

The draw back of using this option is that you’re only allowed to have one sales/purchase order per put-away/pick. This means that you won’t be able to group the orders together in one warehouse shipment (as stated above) to generate a consolidated bill of lading. Same goes for the receiving side, you won’t be able to receive by container or by bill of lading.

This option works perfectly if you want to enable Bin Mandatory. The Inventory Pick/Put-away document generated will allow you to split lines at the warehouse document level so you can put the items away in their proper bin without having to modify the original purchase or sales order.

Pros: Allows you to easily process inventory transactions by Bin Warehouse Manager can control what he/she wants to ship based on released orders instead of the order processor printing out a pick ticket The warehouse process is separated out from the order fulfillment process (so warehouse can do their own posting) More accurate inventory can be achieved since inventory can be relieved when it’s shipped

Cons: Not able to group orders together into one shipment or receipt Not be able to use ADCS (wireless handheld)

You Typically See This Setup For: Companies that would like to organize their warehouse by bin, but does not have the manpower to go Directed Pick/Put-away.

Directed Pick and Put-away

This is the full deal. It has all of the benefits that I’ve listed above. Group order together by warehouse shipment and be able to pick and put away by bins. Not only that, this allows you to use ADCS (wireless handheld device) so your warehouse staff and record warheouse transactions using the handheld.

All good right?

Not exactly. It really depends on what your company needs. All these features sounds cool, but if your business does not need it, trying to shove it in may create more work and processes than necessary. There are a couple of steps where the user need to interface with a computer when you enable Directed Pick and Put-away:
1. Create the sales order
2. Create warehouse shipment
3. Create pick
4. Register pick
5. Post warehouse shipment
6. Post sales order

Whereas if you do not enable any of these, the steps would be:
1. Create the sales order
2. Post the sales order

Conclusion

It’s highly recommended that you get with your Dynamics 365 Business Central (Dynamics NAV) partner and discuss which setup is right for your business RIGHT NOW with consideration for future growth. If you try to implement everything without any consideration for your current operation, the operational efficiency will decrease. This is because of the increased overhead and maintenance that are required.

Make sure your company have the manpower and the infrastructure to absorb the overhead and maintenance required so the increase in efficiency and accuracy can be realized.

Do not implement some feature just because you like the feature. In most cases, it will be overkill. It’s like buying a size 10 top-of-the line Nike tennis shoes for your 3 year old son and forcing him to walk in it every day. Eventually, he will grow into it. But by the time he grows into it, he’ll develop some other major problems that will cost more money to fix.

Properly Setup Bin Code for Warehouse Management in Dynamics NAV

Overview
One of the most often asked about features when dealing with inventory is the ability to keep track of inventory by bins in the warehouse. While The Warehouse Management System will benefit the accuracy of the items that are stored in the bins, careful consideration must be made during setup so when you go live, less additional work is needed for the system to work for you.

On a macro level, before you eve consider implementing a warheouse management system, your warehouse itself MUST BE ORGANIZED! What I always tell customers is that the purpose of a computer systems is to help you do something faster. This means that if you’re warehouse is a mess, implementing a warehouse system will make it more messy, faster. However, if you’re warehouse operation is efficient and optimized, then implementing a warehouse system will help you become more efficient and optimized, faster.

The Bin Codes
While there are many considerations for setting up warehouse management in NAV, this article will focus on one of the most overlooked areas.

The Bin Codes.

The Path of the Picker
There are many differnet theories about how to create the most efficient picking path. But generally, you want the path of the picking so the following occurs:

1. When picking for an order, they would not have to come back to the same bin in the same level
2. When picking, they should pick from the eye level (or the level where they don’t need special equipment). This is typically the first level.

Keeping it simple and not concerning with spliting into Zones, wave picking, and whatnot, the pattern the warehouse picker should walk is the following:

Warehouse path for picker

Only when the above is exhausted, do we use special equipment and pick from the higher levels. The general rules are the same, you want to use the run time for the special equipment should be as minimal as possible.

The Sort Order of the Pick Bins
In order to get the path described above, we have to first understand how Dynamics NAV priortizes what bin is selected when a pick is generated. Consider the following bins numbers for your warehouse:

Typical Bin Code for Warehouses

The first 2 characters is Section, then Isle, then Level

When the pick from NAV is generated, it will suggest the pick in the following order (assuming no bin ranking is used).

NAV Suggested Pick Order

As you can see, it will create the pick on a decending order.

Why Suggest the Bins in Decending Order?
The answer lies in the help for the Bin Ranking field found in the Help or on MSDN:

The program will suggest a pick from the bin with the highest numerical ranking. Items in the highest-ranking bins (bins with the highest number in the field) will thus be picked first

Makes sense.

Why Not Use the Bin Ranking?
We could. But tread carefully! Bin Ranking provides a lot of flexibility on how the bins are ordered during the directed pick/put-away. Not paying special attention to how to rank the bins will give you more pain and suffering.

Assuming you rank all of the 1st level bins the highest, and level 4 the lowest. The resulting pick order NAV would generate for its pick is the following:

Warehouse4

This means that NAV will ask the warehouse picker to pick from the section that’s furthest away from the warehouse (assuming that’s section C). Very good for letting your warehouse picker get excercise, not really good for pick efficiency.

Two Ways You Can Go About This

Property Setup the Bin Ranking
If you want to utilize the Bin Ranking, then you will need to sort it based on how you want the warehouse user to logically pick/put-away. In the example above, the bin ranking would be set as the following:

Proper Bin Ranking Setup for a Warehouse

You will need to carefully configure how to assign the bin ranking. In addition, if there are any changes to your bins (add/remove), you will need to break out the spreadsheet and reassign all bin rankings again.

Modify the Default Bin to sort in Acending Order instead of Decending Order
Doing so will allow Dynamics NAV to “sort” to pick from A section to D section. However, it will also ask the picker to pick from multiple levels first instead of the 1st level.

You will need to reconfigure how your bin codes are setup. Instead of Section – Row – Level, you will need to reconfigure your layout as Level – Section – Row:

Warehouse6

This will ensure that all of the 1st levels are picked first. Then it will then pick the 2nd level, then the 3rd, etc. This option may not be feasible if you’ve already spent the time and effort on labeling all of your bins. This option may also not be feasible if you want them to pick from the same column once they got the forklift truck. However, this option will require the least amount of maintenance.

Conclusion
Having implemented both methods for clients with warheouse management requirements for Dynamics NAV, both methods have their pros and cons. And they both work for the respective companies.

Bin Ranking will work wonders if you take the time to set it up right, but maintenance is a hassel. Reconfiguring the bins is simple, but you have to becareful about how NAV sorts the bins.

Again, both methods work. It really depends on how you implement this.