Overview
On Dynamics 365 Business Central release 18, Microsoft made significant changes to the bank reconciliation features. Most of the articles and videos on entering beginning bank balances are still based on the older versions Dynamics 365 Business Central or Dynamics NAV.
Just thought I would share with the community on setting up your beginning bank balances if you’re moving to Business Central from your legacy accounting /ERP software
The goal is to have your bank balance match your G/L account. Just posting whatever is in your G/L to your bank is not the way to go and you’ll run into trouble later in future reconciliations.
Do it right initially will save you tons of trouble later.
Here are the steps to enter the beginning balances of your bank when you’re migrating from your legacy ERP/accounting software to Dynamics 365 Business Central.
What You Need
As with anything, preparation is key. There are a few things you need before entering your beginning bank balance.
Assuming you’re going live with Business Central on December 1st, they are:
- Previous bank reconciliation before you go live. For example, if you plan to go live on December 1st, you’ll need the bank statement from November 30th.
- A list of outstanding checks and transactions not cleared by the bank up to November 30th
- Your reconciled G/L bank balance from your old legacy system. This means you need to do one last bank reconciliation from your legacy system up to November 30th
How do you know if you have everything put ready? Here’s a simple formula:
Your G/L balance for your cash/bank account as of November 30th
+/- Outstanding bank transactions that’s not been cleared
= Amount on the Bank Statement as of November 30th
For example:
G/L Balance as of 11/30 = 10,000
Outstanding uncleared checks and deposits as of 11/30 = 2,000
The bank statement that you got from the bank on 11/30 should be 12,000.
If the above formula is not true, do not proceed! Get it right so it can save you headaches down the road.
How This is Going to Work
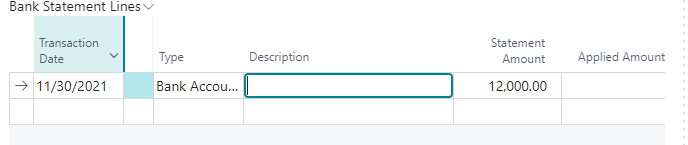
Once you post the entries via General Journal (make sure the Account Type is Bank Account), run your first bank reconciliation as November 30th, or the period before you go live.

When you run your bank reconciliation for November 30th, manually enter the previous bank statement total in the Bank Statement Line section. DO NOT run the bank feed import for this period as nothing you import can be reconciled against.
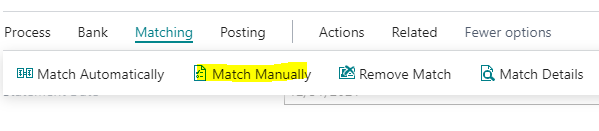
Click on Matching -> Match Manually to match the entry that you’ve made for the Beginning Bank G/L Balance entry.
Once the matching is done for the beginning entry, you can post the reconciliation.

For your bank reconciliation for the following period, all of the unreconciled transactions will display for you to clear against.
Conclusion
Now you may be asking “But wait Alex, we won’t get your bank statement until a few days after we go live!”
That’s okay!
You don’t need your bank beginning balances as soon as you go live. We typically get the bank beginning balances (and other non-operation related balances) setup about a week after go live.